Using a dolly track for large 360 product photography
The Problem
In the fall of 2020, we had a customer come to us with a novel problem. They had multiple products that could not be moved, they were large, and to top it off, they were fragile. With the Covid revolution in product photography and online viewing with reduced visitation to the museums, they wanted to go virtual, and they asked if we could help. We came up with a dolly track idea that got the job done.
Picture this: 50 products that are all about 12 feet tall, each weighing in at anywhere from 100 to 900 pounds, and some that are even covered with glass … Christmas trees! And the pièce de résistance of it is that we only had 3 days to photograph them all.
After a little bit of thinking and some quick research, we had an idea. Why not use a dolly track for the trickiest of them, and then use one of our medium rotators and a forklift for the rest. Sure this sounds great, except we didn’t have a dolly track that would do the job. So we built one.
The Planning
The plan was to build a light, easy to use dolly track, that had a diameter of 22′. It needed to be able to be broken down and set up quickly. We needed it to work on the floor as well as about 40 inches in the air. It didn’t need to carry much weight as we only had a DSLR on the rig. It was not for motion graphics, but instead, just for stop animation, also we thought that the joints between the sections would not be an issue.
Ok, that sounds about right for planning. Nothing like a seat of your pants creation, right.
The Research
We had about a week to research our options before we needed to start building. It looked like plastic tracks were light and easy to deal with, but those didn’t seem to keep their shape if it was not in a complete circle. That was out. Next, we looked at metal options and we liked the idea of using Electric Metallic Tube (EMT) conduit. It fit for price, availability, and weight, but we had no good way to bend it. Back to the research. After a little looking, we came up with a roller bender that could do the trick. Now on to the math… I will just stop right here and say Thank You to my high school math teacher from 25 years ago. He helped out greatly on the numbers.
The Supplies
(24) 10′ x ¾” EMT conduit
(2) 4′ x 8′ x ¾” Plywood sheets
(100’s) Screws
(1) 10′ x ½” plastic conduit
(8) Caster wheels
(1) 4′ x 8′ Sheet of Masonite
(12) Spirit levels
(12) Turnbuckles
The Track of the dolly track
We used a large concrete area to draw out our circles. Chalk helped here! Once the circle was created, we could break it down into the segments that we needed. We had decided that 12 segments would break the track down into usable sections, and give us a rotation setting that never landed on the seams. After a little trial and error, we found the right settings for the roller bender to create the curves for the track. Using the studio’s laser cutter, we made a gauge marker and a curve template. These helped with making a 4′ x 8′ plywood build template, which helped us create the multiple track sections accurately. Each track section was 2 pieces of EMT, 4 track ties made out of ¾” plywood, 16 screws to connect the pipe to the ties, a turnbuckle to connect each piece of track to the next, ½” plastic conduit cut with a slit to make connector pins with the track pieces, and that was about it.
With 2 people working for about 8 hours, we made a working dolly track!
The Dolly of the dolly track
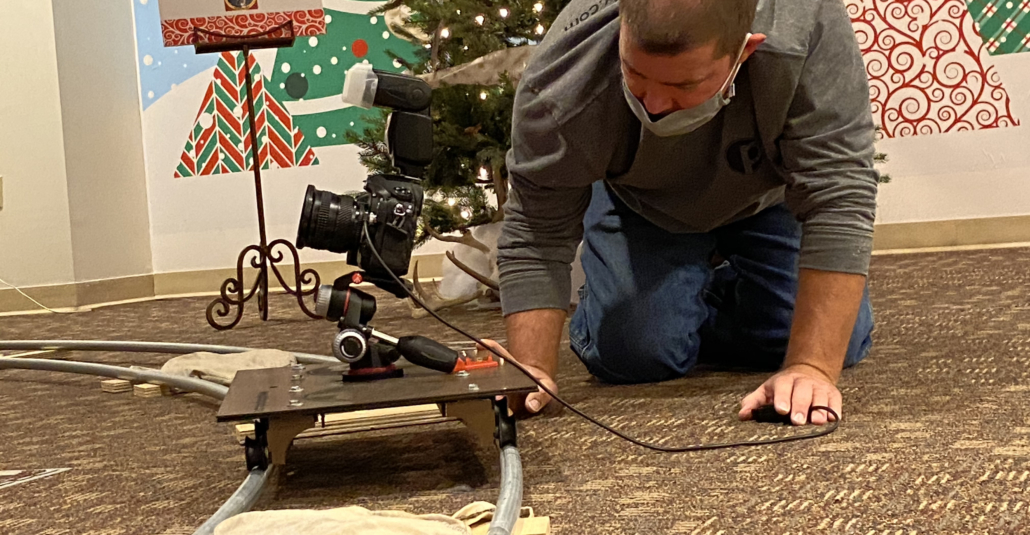
Amazon helped in the creation of the dolly itself. We had a good design prototype, but we needed wheels that would run smoothly on the track. Originally, we had thought about the 90º V design where you use multiple wheels at each location. After searching on Amazon, we found caster wheels that already had a rounded groove in them for the pipe. They worked great! They lined up with our ¾” EMT conduit and they came with bearings installed. The dolly was created with our laser cutter and was designed with 8 wheels, all in a curved formation to follow the radius of the track. Funny side note here: the dolly rolls on a perfectly flat floor almost as well as it does on the track.
The Results
After all of the creation and fun time working through a few problems, we needed to put the dolly track into practice. After setup, we did need to adjust the track a little, and this was probably our one mistake. By adjusting the entire track in place, we made the tracks only fit in sequential order. Not a major issue, because we numbered them. But on the days of the shoot, when we had only partial pieces of the track at multiple locations around the building, they did get out of order.
Here is an example from the shoot at the Indiana Historical Society’s Festival of Trees, where we used the track option for our 360 views.


